Deploy a Production Ready Kubernetes Cluster With lxc Container and Kubespray

Deploy a Production Ready Kubernetes Cluster With lxc Container and Kubespray
I am going to show the workground how you can use lxc container to create a production grade cluster. Though its hard to create kubernetes cluster with lxc container but its possible. So lets see how we can solve all of those challenges step by step
Step 1: Prepare host machine
a) edit following file
nano /etc/sysctl.conf
# Uncomment the next line to enable packet forwarding for IPv4
net.ipv4.ip_forward=1
b) disable firewall
ufw disable
c) disable swap
swapoff -a; sed -i '/swap/d' /etc/fstab
d) update sysctl settings for kubernetes networking
cat >>/etc/sysctl.d/kubernetes.conf<<EOF
net.bridge.bridge-nf-call-ip6tables = 1
net.bridge.bridge-nf-call-iptables = 1
EOF
sysctl --system
Step 2: Create lxc profile
config:
  boot.autostart: "true"
  linux.kernel_modules: ip_vs,ip_vs_rr,ip_vs_wrr,ip_vs_sh,ip_tables,ip6_tables,netlink_diag,nf_nat,overlay,br_netfilter,nf_conntrack,xt_conntrack
  raw.lxc: |
    lxc.apparmor.profile=unconfined
    lxc.mount.auto=proc:rw sys:rw cgroup:rw
    lxc.cgroup.devices.allow=a
    lxc.cap.drop=
  security.nesting: "true"
  security.privileged: "true"
description: Default LXD profile
devices:
  eth0:
    name: eth0
    network: lxdbr0
    type: nic
  root:
    path: /
    pool: default
    type: disk
name: microk8s
used_by:
- /1.0/instances/node1
- /1.0/instances/node2
- /1.0/instances/node3
Step 3: Create a linux container
lxc launch -p default -p microk8s ubuntu:21.04 node1
Step 4: Inside container do following
a) following command should return output
conntrack -L
modinfo overlay
b) if above command output error then its seems that there some karnel related problem. Install and fix karnel issue
sudo apt install linux-generic
sudo apt install --reinstall linux-image-$(uname -r);
sudo apt install --reinstall linux-modules-$(uname -r);
sudo apt install --reinstall linux-modules-extra-$(uname -r);
this should fix karnel related issue.
c) Recent kubernetes versions want to read from /dev/kmsg which is not present in the container. You need to instruct systemd to always create a symlink to /dev/console instead:
echo 'L /dev/kmsg - - - - /dev/null' > /etc/tmpfiles.d/kmsg.confif it not working then run following
echo 'L /dev/kmsg - - - - /dev/console' > /etc/tmpfiles.d/kmsg.conf
if it still not work then do following
# Hack required to provision K8s v1.15+ in LXC containers
mknod /dev/kmsg c 1 11
echo 'mknod /dev/kmsg c 1 11' >> /etc/rc.local
chmod +x /etc/rc.local
d) if you need to load any module then you can run following comman
# cmd    module name
------------------------
modprobe br_netfilter
Thats all. Now follow the Kubespray official document.
To access k8s cluster without execing into master node
Download the kubectl command into your local.
which kubectl
# output: /usr/bin/kubectl
Create .kube directory
mkdir ~/.kubecopy config from kmaster into .kube directory
lxc file pull kmaster/etc/kubernetes/admin.conf ~/.kube/config

#check cluster
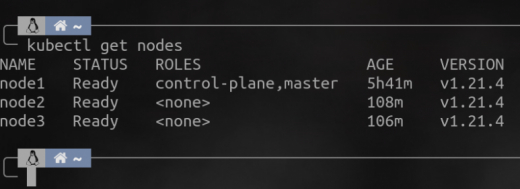
kubectl get nodes


